
Building a gravel patio is one of the smartest moves for homeowners who want outdoor living space without the price tag of concrete, pavers, or decking. With materials running as low as $1.50 per square foot for bulk gravel and installation simple enough for a weekend warrior, it’s possible to create a functional, attractive patio for a fraction of what traditional hardscaping costs. No specialized tools, no heavy equipment rentals, and no need for a contractor, just solid planning and a willingness to move some stone.
Table of Contents
ToggleKey Takeaways
- Gravel patio ideas on a budget cost $300–$600 for materials on a 200-square-foot space, making them 75% cheaper than concrete while remaining DIY-friendly over a weekend.
- Proper installation requires a 5–7 inch excavation depth with a compacted base layer and landscape fabric to prevent weeds and ensure long-term stability and drainage.
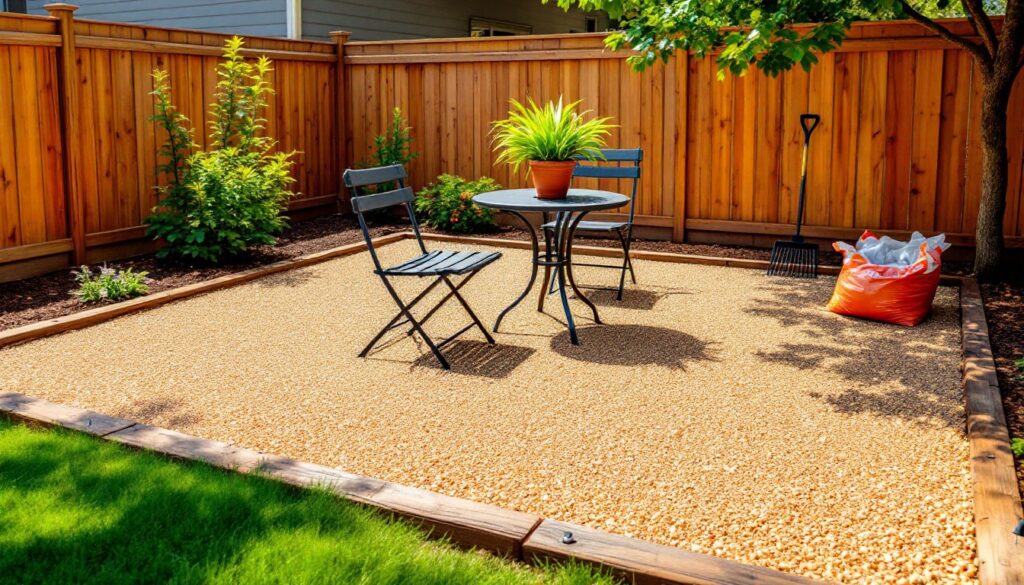
- Mixing gravel types and colors—such as gray granite for seating areas and tan pea gravel for pathways—creates visual contrast and spatial definition without additional cost.
- Reclaimed materials like salvaged bricks and broken concrete chunks provide rustic, inexpensive borders that rival new edging options in both durability and aesthetic appeal.
- Monthly raking, annual top-dressing ($50–$100/year), and proper edge maintenance keep your gravel patio looking polished with minimal effort compared to decks or concrete surfaces.
Why Gravel Patios Are Perfect for Budget-Conscious Homeowners
Gravel patios deliver serious value compared to alternatives. A 200-square-foot concrete patio typically costs $1,200 to $2,400 installed, while the same area in gravel runs $300 to $600 for materials and can be DIY’d in a single weekend. There’s no curing time, no forms to build, and no mixer to rent.
Drainage is built-in. Unlike solid surfaces that require slopes and drains, gravel allows water to percolate straight through, eliminating puddling and runoff issues. This makes gravel ideal for areas with heavy rain or poor soil drainage.
Mistakes are fixable. Pour concrete wrong and you’re looking at a jackhammer and a dumpster. Lay gravel poorly and you rake it out and start over. That forgiveness matters for first-timers.
Gravel also sidesteps most permit requirements. Because it’s not a permanent structure and doesn’t alter drainage patterns significantly, most jurisdictions don’t require permits for gravel patios. Always check local codes, but you’ll likely avoid the paperwork and fees that come with concrete or deck builds.
Essential Materials and Tools You’ll Need
Materials:
- Landscape fabric (3-4 oz woven polypropylene, not the flimsy stuff), blocks weeds without stopping drainage
- Gravel: Plan on 3 to 4 inches depth for the top layer. Common budget options include pea gravel ($30-$50/ton), crushed limestone ($25-$40/ton), or decomposed granite ($35-$60/ton depending on region)
- Base layer: Class 5 gravel or crushed rock fines, 2-3 inches compacted, provides stability and prevents the top layer from sinking
- Edging: Treated landscape timbers ($8-$12 each), steel edging ($2-$3/linear foot), or plastic paver edging ($0.50-$1/linear foot)
- Landscape spikes or stakes to secure edging
- Sand (optional, for leveling if ground is uneven)
Tools:
- Spade or flat shovel for excavation
- Rake (both garden rake and landscape rake if you have one)
- Wheelbarrow for hauling
- Tamper or plate compactor, a hand tamper runs $25-$40 and works fine for small patios: rent a plate compactor ($60-$90/day) for areas over 150 square feet
- Level (4-foot or longer)
- Measuring tape and marking paint or stakes with string
- Work gloves and knee pads, you’ll be on the ground a lot
Most homeowners already own half this list. The specialized items, tamper, edging, are one-time purchases that’ll serve multiple projects.
Step-by-Step Guide to Installing Your Gravel Patio
1. Mark and measure the area. Use stakes and string or marking paint to outline the patio footprint. A 10×20-foot rectangle (200 square feet) is a common starter size. Check corners with the 3-4-5 triangle method to ensure square.
2. Excavate to depth. Dig down 5 to 7 inches below final patio surface level, that’s 2-3 inches for base, 3-4 inches for gravel. Remove sod, roots, and rocks. Slope the excavation slightly away from any structures (about 1 inch per 8 feet) for drainage.
3. Compact the soil. Use a hand tamper or plate compactor to firm up the dirt base. Loose soil will settle and create low spots later.
4. Install edging. Secure your border material around the perimeter. Landscape timbers should sit flush with the surrounding grade or slightly above to contain gravel. Drive landscape spikes every 3 feet to anchor them. Steel or plastic edging gets staked every 2-3 feet. This step prevents gravel migration.
5. Lay landscape fabric. Roll it out across the excavated area, overlapping seams by 6 inches. Cut slits around edging stakes. Some DIYers skip this, but fabric dramatically reduces weeding and keeps base and top layers from mixing.
6. Add and compact base layer. Spread 2 to 3 inches of Class 5 gravel or crushed rock fines. Rake level, then compact thoroughly with your tamper or compactor. This layer provides structural support, don’t skip it or go thin.
7. Spread top gravel. Pour and rake 3 to 4 inches of your finish gravel. Pea gravel is comfortable underfoot: crushed stone locks together better but feels sharper. Rake smooth and check level as you go.
8. Compact and settle. Lightly tamp the top layer or let foot traffic and weather settle it naturally over a few weeks. Add more gravel to fill any low spots.
Permit check: Gravel patios typically don’t require permits, but if you’re near a property line, in a flood zone, or altering drainage significantly, verify local rules before digging.
Creative Design Ideas to Maximize Your Budget
Gravel’s flexibility lets you stretch dollars without sacrificing style. Many budget-friendly pea gravel designs run around $5 per square foot installed, and that includes creative touches.
Mixing Gravel Types and Colors for Visual Impact
Combining gravel creates zones without adding cost. Use crushed gray granite for a main seating area and tan pea gravel for pathways or planting beds within the patio. The contrast defines space and adds dimension.
Layering colors works too. Spread a base of inexpensive brown crusher fines, then top high-traffic areas with a 3-inch cap of white marble chips. The white stays visible where it matters, but you’re not paying premium prices for the entire depth.
Decomposed granite (DG) is another budget win. It compacts almost like pavement when wetted and tamped, giving a semi-solid surface for about $40-$60 per ton. Mix DG borders with a pea gravel center for texture variety.
Adding Borders and Edging on the Cheap
Reclaimed materials beat new every time on price. Salvaged bricks, broken concrete chunks (urbanite), or old pavers create rustic borders for little to nothing. Stack them dry or set them in sand, no mortar required.
Treated 4×4 or 6×6 timbers offer clean lines at $8-$12 per 8-foot length. Cut to size with a circular saw, stake in place, and you’ve got solid containment. They’ll last 10-15 years in ground contact.
Steel edging bends to curves and sits nearly invisible when installed right. At $2-$3 per linear foot, it’s mid-range but gives a pro look. For tighter budgets, plastic paver edging does the job for half the cost, it’s less durable but fine for low-traffic edges.
River rock borders add visual weight. A single row of 4- to 6-inch river stones along the perimeter costs around $50-$80 per ton and creates a natural transition to lawn or garden beds.
Low-Cost Maintenance Tips to Keep Your Patio Looking Great
Gravel patios need far less upkeep than decks or pavers, but a little routine care prevents problems.
Rake monthly. A quick pass with a landscape rake redistributes gravel, fills footprint depressions, and keeps the surface even. Takes five minutes.
Top-dress annually. Gravel migrates, settles, and gets tracked off. Budget $50-$100/year to add a half-inch fresh layer. This keeps depth consistent and refreshes color.
Weed control: Quality landscape fabric handles most weeds, but some will sprout in the gravel itself. Hand-pull when small, or spot-treat with a non-selective herbicide like glyphosate (follow label instructions and keep pets off treated areas until dry). For an organic approach, boiling water or vinegar solutions work on young weeds.
Edge trimming: Grass and ground covers creep into gravel. Edge monthly with a half-moon edger or string trimmer to maintain clean borders. This simple habit prevents the patio from looking sloppy.
Replenish and re-level: High-traffic zones compact faster. Keep a half-bag of gravel on hand to fill divots as they appear. Catching them early beats a full resurface later.
Leaf and debris removal: Use a leaf blower rather than a rake for fall cleanup, it clears leaves without disturbing gravel. For heavier debris, a plastic leaf rake works without catching stones.
Avoid power-washing gravel. It displaces material and washes fines into the base layer, creating a mess. Spot-clean stains with a hose and brush instead.
With basic care, a gravel patio outlasts most deck finishes and never needs sealing, staining, or patching like concrete. The maintenance budget stays minimal, mostly your time and an occasional bag of stone.


