
An elevated deck does more than expand living space, it creates a destination. Whether the home sits on a slope, features a walk-out basement, or simply needs better backyard access from an upper floor, a raised deck solves problems while adding serious curb appeal. The right design turns what could be a simple platform into an outdoor room with views, built-in features, and architectural interest. This guide walks through practical elevated deck ideas that balance function, code compliance, and style, from multi-level layouts to material choices that hold up in real-world conditions.
Table of Contents
ToggleKey Takeaways
- An elevated deck requires structural support rated for at least 40 pounds per square foot of live load, plus proper ledger board attachment, footings below the frost line, and mandatory guardrails above 30 inches—skip these details and you risk safety failures and code violations.
- Multi-level deck designs break up large spaces into distinct zones for dining, lounging, and entertaining while adapting naturally to sloped lots and reducing the need for excessive support posts.
- Built-in seating, storage benches, and integrated planters maximize functionality without cluttering the elevated deck space, and proper framing ensures they’re structurally sound and weather-resistant.
- Choose composite decking for elevated decks exposed to constant moisture since it resists mold and splintering better than wood, though the substructure still demands treated lumber and engineered beams rated for the deck’s full load capacity.
- Lighting, pergolas, and cable railings transform an elevated deck from a daytime platform into an evening outdoor room, but all overhead structures must attach with load-rated hardware and meet local setback and coverage codes.
- Obtaining permits and passing inspections is non-negotiable for elevated decks over 30 inches high, protecting you from fines, insurance issues, and mandatory removal during a home sale.
Why Choose an Elevated Deck for Your Home
An elevated deck, typically any deck more than 30 inches above grade, makes sense when terrain or home design demands it. Sloped lots, second-story doors, and walk-out basements all benefit from raised platforms that turn unusable space into functional outdoor living areas.
Beyond solving access issues, elevation offers advantages. Views improve when the deck sits higher, clearing fences and neighboring structures. Airflow increases, which keeps the space cooler in summer and helps decking materials dry faster after rain. The area beneath can serve as storage, a covered patio, or screened living space, maximizing every square foot of the footprint.
That said, elevated decks require more planning than ground-level builds. Structural support becomes critical, posts, beams, and footings must handle live loads (typically 40 pounds per square foot for residential decks) plus dead loads from decking, railings, and any built-in features. Most jurisdictions require permits for decks over 30 inches high, and guardrails become mandatory at that height per the International Residential Code (IRC). Footing depth, lateral bracing, and ledger board attachment all come under scrutiny during inspections.
If the deck will be more than eight feet high or carry a hot tub or heavy pergola, consider bringing in a structural engineer or licensed contractor. The investment in proper design upfront prevents expensive fixes, or worse, safety failures, down the line.
Multi-Level Deck Designs for Added Dimension
Multi-level decks break up a large footprint into distinct zones, creating visual interest and defining uses without walls. A lower tier might hold a dining table and grill, while an upper level serves as a lounge with built-in seating. The transition between levels, usually a single step of 7 to 8 inches, adds dimension without requiring a full staircase.
This approach works especially well on sloped lots. Instead of building one massive deck with extensive support structure, stepping the platform down follows the natural grade, reducing the need for tall posts and deep footings in some areas. It also improves sightlines: guests on the lower level aren’t staring at the underside of the upper deck, and those above get unobstructed views.
For homes with second-story access, a landing-and-stairs layout creates a graduated descent to grade level. The main deck sits at the door threshold, a mid-level landing breaks the run of stairs, and a ground-level patio or small lower deck completes the sequence. This design meets code requirements for stair rise and run (typically a maximum 7.75-inch rise and minimum 10-inch tread) while making the descent feel less daunting.
Framing complexity increases with multi-level designs. Each level needs independent support, and where platforms meet, beams and joists must align or transfer loads correctly. Flashing and drainage details become more critical to prevent water from pooling at transitions. If tackling this as a DIY project, take extra time with the layout and consult local building codes for guardrail and ledger requirements at each level change.
Built-In Seating and Storage Solutions
Built-in benches eliminate the need to haul furniture up stairs and create permanent seating that won’t blow over in wind. Standard bench height runs 18 inches from the deck surface, with a seat depth of 15 to 18 inches for comfortable sitting. Back support adds another level of comfort, plan for a backrest that rises to about 36 inches (which often doubles as a guardrail if the bench sits at the deck perimeter).
Framing benches during the deck build integrates them structurally. Notch posts to accept horizontal seat supports, or bolt 2×4 cleats to perimeter joists to carry the seat frame. Composite or rot-resistant lumber (cedar, redwood, or pressure-treated pine) works well for seat tops, which see constant moisture from rain and spills. Leave 1/8-inch gaps between seat boards for drainage.
Storage benches hide cushions, grill tools, or pool toys. Hinge the seat top to reveal a weatherproof box below, or build a false bottom with access from the front. Line the interior with exterior-grade plywood and add a drip edge along the front to keep rain out. For elevated decks, consider utilizing the space beneath the platform for larger storage, a lockable shed-style enclosure under the deck keeps lawn equipment and seasonal items out of sight while keeping the deck footprint open.
Built-in planters add greenery without taking up floor space. Frame boxes along the perimeter, line them with pond liner or heavy-duty plastic, and drill drainage holes in the bottom. Fill with lightweight potting mix rather than garden soil to reduce weight on the structure.
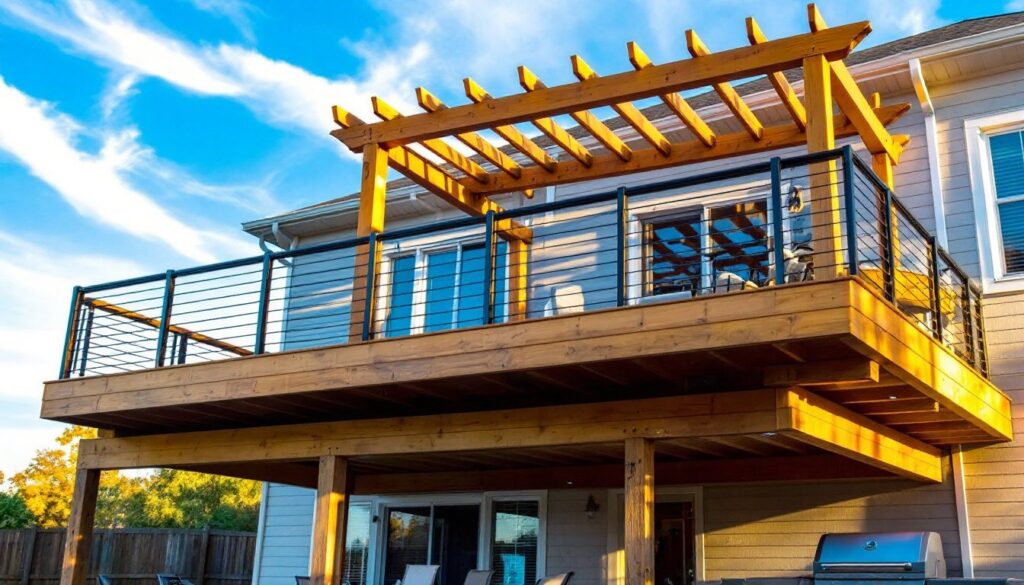
Pergolas, Railings, and Lighting Features
A pergola defines space without enclosing it, providing partial shade and a framework for climbing plants or retractable fabric panels. Standard pergola height runs 8 to 10 feet from the deck surface, with crossbeams spaced 12 to 16 inches apart for a balanced shade pattern. Attach posts to deck framing with heavy-duty brackets rated for uplift and lateral loads, wind can exert serious force on overhead structures.
Check local codes before building. Some jurisdictions treat pergolas as covered structures, which can affect setback requirements and lot coverage calculations. If the pergola will support a roof or heavy shade cloth, it may require separate permitting.
Railing systems serve two purposes: safety and style. IRC requires guardrails at least 36 inches high for any deck more than 30 inches above grade, with baluster spacing no wider than 4 inches (to prevent a 4-inch sphere from passing through). Cable railings offer clean sightlines, while traditional balusters in wood or metal provide more privacy. Composite and aluminum systems require less maintenance than wood but cost more upfront.
Lighting transforms an elevated deck from a daytime space into an evening destination. Low-voltage LED systems (12V or 24V) install easily and draw minimal power. Post cap lights mark perimeter edges and stair locations for safety. Recessed deck lights mounted between joists illuminate treads without creating glare. String lights or lanterns add ambiance but should hang from structure rated to carry the load, not from railing tops, which aren’t designed for tension.
Run wiring during framing to avoid surface-mounted conduit later. Use outdoor-rated boxes and GFCI protection for any outlets. If the deck sits far from the house, consider a separate circuit to avoid voltage drop and nuisance tripping.
Material Choices: Wood vs. Composite Decking
Pressure-treated lumber remains the most affordable decking option, running roughly $2 to $4 per linear foot for 5/4×6 boards (actual dimensions: 1 inch by 5.5 inches). Treated pine resists rot and insects but requires regular staining or sealing, plan on recoating every two to three years. It also tends to warp and check as it dries, so buy boards kiln-dried after treatment (KDAT) when possible.
Cedar and redwood offer natural rot resistance and a refined appearance without chemical treatment. Expect to pay $4 to $8 per linear foot. Both species weather to a silver-gray patina unless sealed with a UV-blocking finish. They’re softer than treated pine, so dents and scratches show more readily in high-traffic areas.
Composite decking blends wood fiber and plastic, eliminating the need for staining while resisting fading, mold, and splintering. Prices range from $5 to $12 per linear foot depending on brand and finish quality. Installation requires specific fasteners and spacing, composites expand and contract more than wood, so follow manufacturer guidelines for gap sizing (typically 1/8 inch on the sides and 1/4 inch at ends). Capped composites add a protective shell that improves stain and scratch resistance, which matters if the deck will see heavy use.
For elevated decks with integrated hot tub installations, composite decking handles moisture exposure better than wood, though the framing underneath still needs treated lumber or engineered beams rated for the additional weight. A filled hot tub can add 4,000 to 6,000 pounds to the load calculation, verify joist sizing and footing capacity before placing one on any deck.
Don’t overlook the substructure. Joists, beams, and posts bear the real load, and cutting corners here causes problems regardless of what decking material sits on top. Use joist hangers rated for the lumber size, galvanized or stainless hardware in treated lumber to prevent corrosion, and proper flashing wherever the ledger board attaches to the house.
Safety Considerations for Elevated Deck Construction
Permits and inspections aren’t optional for elevated decks. Most jurisdictions require a permit for any deck over 30 inches high, and many require one for any deck attached to a dwelling. The inspection process typically includes a footing check before concrete pour, a framing inspection before decking goes down, and a final inspection after railings and stairs are complete. Skipping permits risks fines, insurance complications, and mandatory teardown if discovered during a home sale.
Ledger board attachment causes more deck failures than any other single issue. The ledger must bolt directly to the house framing, not just siding or sheathing. Remove siding in the attachment area, install metal flashing behind and over the ledger, and use 1/2-inch lag screws or through-bolts spaced per code (typically 16 inches on center). If the house has engineered floor joists (I-joists or open-web trusses), consult the joist manufacturer for approved attachment methods, standard lag screws into the rim board may not suffice.
Footing depth depends on local frost lines. In cold climates, footings must extend below the frost depth (often 42 inches or more) to prevent heaving. Concrete footings should be at least 12 inches in diameter for typical deck loads, larger if posts carry significant weight or span long distances. Use precast deck blocks only for ground-level decks in frost-free areas, they’re not suitable for elevated structures.
Fall protection matters during construction and after. Wear a safety harness when working on elevated framing, and install temporary guardrails or warning barriers around open edges. Once complete, the deck needs compliant guardrails and gates that latch securely if there are children or pets. Stair railings should be graspable (1.25 to 2 inches in diameter for round profiles) and return to a post or wall at the top and bottom to prevent clothing from catching.
Always wear safety glasses when cutting lumber, hearing protection with power saws, and work gloves rated for the task. Pressure-treated lumber contains preservatives, wear a dust mask when cutting and wash hands before eating. If the deck will be more than 10 feet above grade or include complex framing like cantilevered sections, this is the time to call a professional or at least bring in an experienced second pair of hands.
Conclusion
An elevated deck adds usable outdoor space, enhances home value, and solves access challenges on sloped or second-story properties. Success comes from solid structural planning, code-compliant construction, and thoughtful design that balances aesthetics with function. Whether building a multi-level retreat with integrated seating or a straightforward platform with quality railings and lighting, the investment in proper materials and execution pays off in decades of safe, enjoyable outdoor living.


